Today’s class will offer a slightly different approach and another traditional technique. We will focus on value today, and color during class 4. Do not worry about warm and cool today---only value. You will only use three colors for today’s exercise: burnt sienna, ultramarine blue and white. You will be surprised by how much you can do with just these three colors.
Step One: I begin with a transparent monochrome as in Day One. Keep the paint thin and washy.
Step Two: I add ultramarine blue to my burnt sienna to create a darker value. Then I paint in the shadow on my model. I add a value to my negative space (background). My paint has a little more body than in Step One, but not heavy.
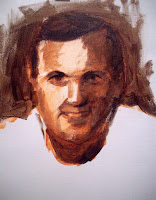 Step Three
: I add a touch of white to some burnt sienna, and paint in the mid tones. I use a dry brush to blend tones a little; but try to not over blend at this point. I’ll actually be covering a lot of this up in later steps. However, since I will be glazing color over this, I don’t want my surface to have a lot of ridges. It will catch the glazes and make streaks on my painting.
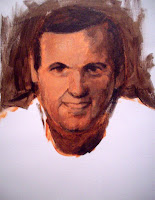 Step Four:
 I mix a lighter value using burnt sienna and white and paint in areas of light. I redraw as needed at any step along the way. For example, one ear was considerably higher than the other….Again, I may use a dry brush to blend a little if desired. Occasionally I like to pretend I’m Leonardo da Vinci and smear a little with my thumb or fingers, but somehow it never measures up….I just keep trying.
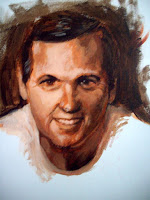
 Step Five: I mix an even lighter version of burnt sienna and white and painting in highlights. I also refine tones in between.
Remember to look for the six categories of light as listed in your Day One handout:
1. Highlight: (nose, brow bone, cheek on my model)
2. Light: (turn of the cheek, forehead)
3. Shadow: (side of the nose, side of the face)
4. Core of Shadow: (right side of cheek, nose, under eyebrows)
5. Reflected Light: (right edge of jaw, neck)
6. Cast Shadow: (under nose, neck)
 Helpful Hints:
 Always work from general tones to more specific ones. For example, don’t get caught up in details like the eyelids until you’ve created a general pattern of light and dark. I always start with the three basics: shadow, midtone (or halftone) and light, then refine from there.
Next week we will focus on adding color and color temperature to the underpainting created today

 Hank Burris
 Carolyn Greer
 Carol Connaughton
 Carol Connaughton
 Carol Connaughton
 Carol Connaughton
 Bob Brooks
 Bob Brooks